Just a reminder … my first give away ends tomorrow. I didn’t realize I would be out of town so I’ll pick the winner Tuesday evening. I know a $5 gift card to Target isn’t much but it’s all I can afford. Leave a comment on my give away post for your chance to win!
Sunday, July 31, 2011
We Missed You File
Mrs. Scoma over at First Grade FUNdamentals posted some very cute freebies today, including a We Missed You label for a file folder when kids are missing. Hers is super cute and would wonderfully for classrooms with a star theme. I created my own to go with my frog theme. Here it is if you want it.

I plan on making a couple of folders in case I’ve got more than one student gone at a time and have a student place an extra of each thing we do during the day in the file for the student who is missing.
Saturday, July 30, 2011
A Teeny Tiny Teacher Give Away!
Kristen over at A Teeny Tiny Teacher is having a give away! She has reached over 300 followers and is giving away a $20 dollar gift card to Barnes and Noble. I don’t know about you all but that could be awfully dangerous for me as not very often can I walk in to Barnes and Noble and spend only $20. But I do have a lot of books on my wish list and this $20 would be oh so helpful. If you would like an opportunity to win this give away head on over to A Teeny Tiny Teacher!
Monday, July 25, 2011
Voice Level Chart & Read to Self Book Bags
Not too long ago I started seeing out there in blog world voice level signs. 
I pinned this one on Pinterest. It comes from http://mrsparkerssecondgrade.blogspot.com/. I decided though it was close to what I want for my classroom that it would be really cool to use the same scrapbook paper that I had used for my clip chart. See here. I think mine turned out really cute. I just wish I had thought to include pictures before I started. Most of my kids would be able to read it by the end of the year. But at the beginning? Not so much! Oh well … repetition, repetition, repetition. We’ll see how it goes without the pictures and then maybe I’ll fix it up again for next year. But for now it looks oh so cute.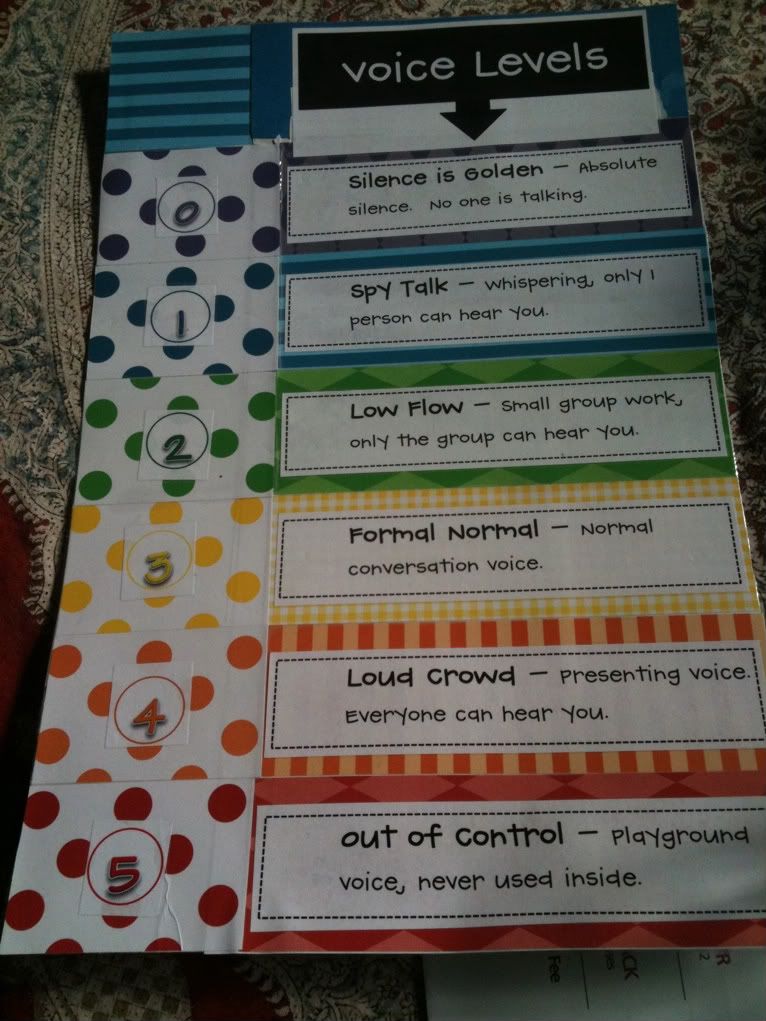
I used the same scrapbook paper as I did before from Hobby Lobby and used spray adhesive to glue them to a poster board. I then cut out the boxes with words that I created using Microsoft Word. I glued those as well as the numbered circles in place, laminated, & cut. And voila! If you would like a copy of the already made boxes and numbers post a comment and I’ll send them your way.
I’ve also been thinking a lot about how I want to do book boxes for our Read to Self time during Daily 5 this year. In previous years I’ve used magazine file boxes but this year I repurposed those boxes into containers for my classroom library.
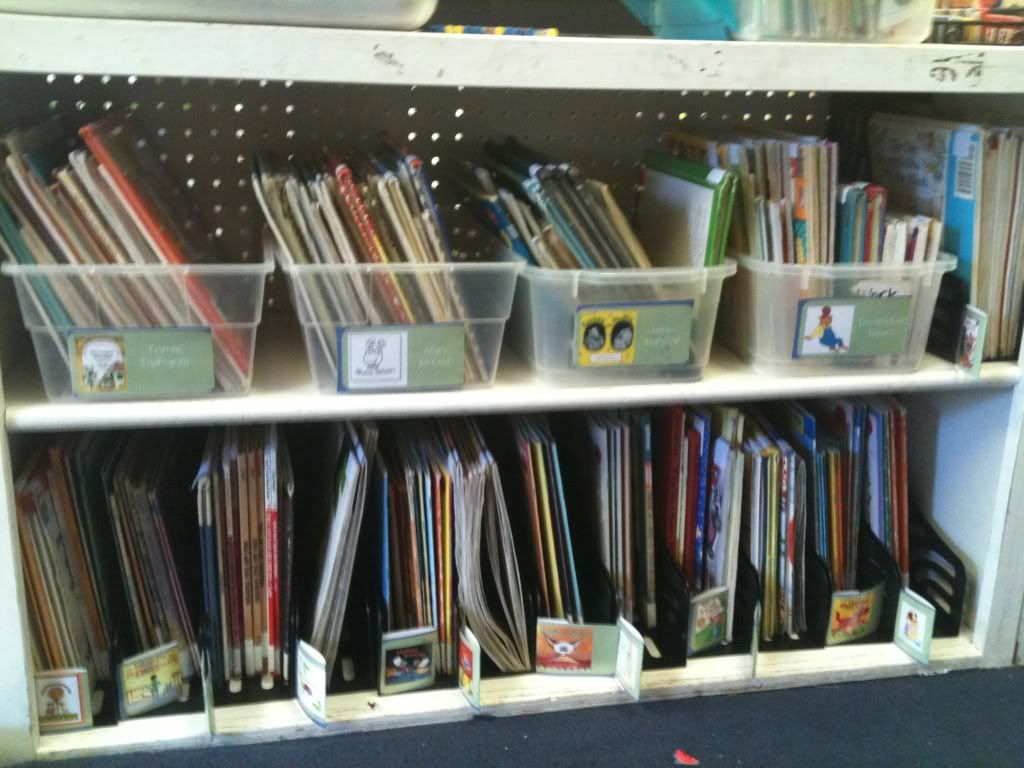
You can see in this picture that groupings of books that I have a lot are kept in larger bins while groupings of books that I don’t have so much of are kept in magazine file boxes placed on their sides. This works well to manage lots of groups of books when they don’t take up the space of a whole bin.
Anyhow … all that to say I’m not using the magazine file boxes any longer for book boxes. They also took up a lot of space in kids’ cubbies. this year I will be giving my kids book bags to use. They can hang this on their cubbies along with their backpacks or place the bags up above in their cubbies if they need to.
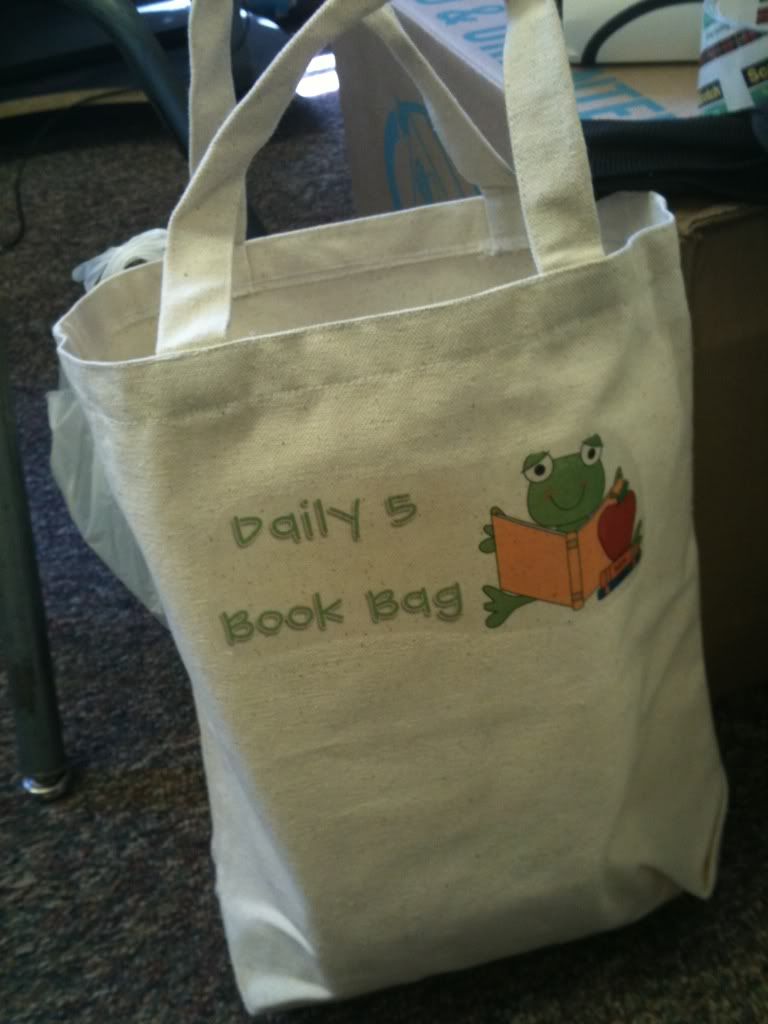
In order to make this book bag I first found a picture to use. I bought the picture of the frog from scrappindoodles. I then copied the picture into the paint program on my computer. (I don’t have any fancy programs on my computer.) Using paint I made a mirror image of the little froggy reading and then pasted it back into Word. I used word Art for the words and used the paint program again to make the mirror image. I was able to fit 3 of these to a page and then printed them out on Iron on Transfer paper. After printing these out I just trimmed around the picture and word art and then ironed them on the bags. Nothing to it. If anyone has any better ideas on how to reverse image words or pictures please let me know. I feel like there should be something easier but I just don’t know what it is.
Sunday, July 24, 2011
More Give Aways
What the Teacher Wants is having a fun giveaway. One of their area teacher stores is giving them a $25 gift card to give away and the great news is you can shop their store online! To enter hop on over to What the Teacher Wants.
Oh Boy 4th Grade is having a huge give away! Head on over to enter.

Back To School Bonanza
Erica Bohler along with 11 other great teachers are hosting a HUGE giveaway! With their Back To School Bonanza you have a chance to win 12 products, one from each of their TpT stores. Head on over to enter.
Saturday, July 23, 2011
Are you Pinning?
I love all the ideas I’m seeing out there on Pinterest and so thankful that a bloggy buddy invited me to join. I have already found so many great ideas and can’t wait to begin creating some of them.

Check out my Pinterest board by clicking below or by using the button to the left.

Michelle at Michelle’s math in the middle is hosting a linky party to share Pinterest boards. If you would like to find more teacher Pinterest boards full of more great ideas follow the link below.

Wednesday, July 20, 2011
50 followers … Time for a Give-Away
Yea! I have 50 followers. I’m so excited!!! Can you tell? I never use exclamation marks so frequently. Each time someone else decides to follow my blog and the number goes up I get a little excited. And now that I have 50 I want to celebrate!
I somewhat frequently include free things I’ve created and I don’t have anything for sale in my TpT store so I can’t use those for a giveaway. How about a $5 gift card to Target. That will get you 4 items from the dollar spot + tax.

There are 4 ways to enter (one is worth two entries):
1. Comment that you follow me.
2. Blog about my giveaway on your blog and link the post in your comment. Worth two entries. Just copy and paste and comment twice.
3. Grab my blog button (It’s nothing fancy … my first attempt and it was successful – meaning it works)
4. Put me on your blog roll.
I will use this random number generator to pick a winner Monday, August 1.
Testing ... Testing ... 1, 2, 3
Just testing out my new blog button to make sure it works. I've hit 50 followers and I'm trying to get a button together you can grab so I can do a give away to celebrate.
If someone would grab my button and put it for a test run and leave me a comment, I would really appreciate it.
Thanks!
Classroom Management
Miss Kindergarten is having a classroom management linky party. I was already thinking about posting part of my classroom management system in my classroom. I just updated and “cutefied” my clothespin chart that I use to chart behavior. Seems like Abby over at The Inspired Apple had the same idea. She did it a little differently however. But you might want to head over there to see what she came up with.
Last year I started the year without a “stop light” chart. I didn’t want students to constantly be thinking about how other students were doing. I began by using a credit/debit economy system instead. I had created a credit/debit book using Adobe Pagemaker. I no longer have the document since the software I was using was an older version and didn’t work with Windows 7. I plan on creating a new document before school starts and will share it with you when I’m finished. Part way into the school year I realized that although I really dislike how students keep track of each other’s behavior, a visual concrete way of tracking behavior was necessary – especially for the kids I had last year. One of my coworkers introduced me to Clip Chart. Clip chart takes the traditional stop light chart and expands it to help promote positive behavior.

I have thankfully found a little bit of time this summer as well as a whole lot of inspiration from my fellow bloggers to make this chart a little more presentable. I found some g reat scrapbooking paper at Hobby Lobby that worked perfectly. I just picked out a page of each color and then glued them together. The blue, pink, purple, yellow, orange, and red are each 6 inches tall and then the green is the full 8 inches. It might be a little long but it will have plenty of room for those clothespins. Last year I ran out of space – especially on the green.

I then went into word and created text boxes for each part of the chart. I created the text boxes for the numbers separately and added those afterwards. Then all I had to do was laminate, cut, and punch holes on the top to hang the chart. I went to Home Depot last year and bought pegboard and had it cut to the size of my bookshelves so that I could have backs to my bookshelves and double it as hanging space. This pegboard is perfect for hanging my clip chart with the way that I arranged my classroom this year. I’m not sure where my students will move their clips if they get off the chart this year. Last year I had the chart hanging with string in my doorway and when they were off the chart they moved their clip on to the string and if they moved higher than that their clip was moved to the internet wire that is nearby. When someone was “on the wire” this was really good news. Anytime students moved off the chart I hot-glued a small sequin to their clip. They loved this of course. If you would like a copy of the text boxes click below.

Saturday, July 16, 2011
Many many giveaways to be had ...
There are so many give aways out there right now. Oceans of First Grade Fun has reached 1,000 followers and to celebrate is giving away 10 of her TpT items from her store. Head over there for a chance to win.
Ladybug Teacher Files has also reached 1000 followers. To celebrate she is giving away 4 blog templates from her Ladybug Teacher Resources blog. Head over to Kristen's blog for a chance to win.
Ladybug Teacher Files has also reached 1000 followers. To celebrate she is giving away 4 blog templates from her Ladybug Teacher Resources blog. Head over to Kristen's blog for a chance to win.
I've been seeing First Grade Owls around but hadn't yet hopped over to read any of her posts. Just became a follower though and look forward to read all of her ideas. First Grade Owls has just reached 100 followers and is celebrating by having a giveaway for one item from Mrs. Will's kindergarten TpT store as well as a gift card for $25 at Target. Hop on over to enter to win.
Wednesday, July 13, 2011
Data Saver Linky Party

Laura Starnes over at Kinder Kraziness is having a linky party to share ideas on how we all back up or store our data. I’ve enjoyed checking out how others organize their files and thought I might have something to add to this conversation. Organization is a bit of a gift of mine.
Last year for Christmas my parents gave me a 1 TB portable hard drive. It has SO MUCH Space!!!! I love it!
This portable hard drive marketed by WD Elements is fairly reasonably priced. Not only do I have my school files stored on this device but there’s also room for all of my music and photographs. I have many, many files downloaded onto this little drive and I don’t think I’ll ever run out of space. There’s just no way!
I split the hard drive into 4 or 5 different categories: First Grade Files, Photos, Music, Spirit Week, and Kindergarten Files from when I used to teach Kindergarten. The First Grade files is then split up into subcategories. (See below.)
Each of these folders is split up even further. I always keep my portable hard drive with my laptop and transport my laptop between home and school. When creating or downloading materials from other fabulous teachers I save them in the file that makes most sense and that I will most easily find it again. Have questions about my subcategories … Just leave it in a comment.
Hope this helps someone!
To see how other teachers are organizing and backing up their files follow the link below ...


 < /a>
< /a>Friday, July 8, 2011
Grade Level Link Up
Head on over to The Teacher's Lane for a great way to link up with other teachers at your grade level.
Wednesday, July 6, 2011
Taberski workshop on comprehension
I've been home for about an hour from a workshop with Sharon Taberski. I had time to grab a bite to eat and put together a new shelf for my home and before I get too tired I want to spend a bit of time blogging to share some of what I learned.
Sharon said she was tired, though I certainly couldn't tell from the way she presented. She is an absolutely phenomenal teacher. So ... what did I learn?
* Background Knowledge needs to be of much more importance in our classrooms than it is currently.
* Reading strategies should be taught as courses for action to accomplish a specific objective. We need to remember to have students practice strategies in purposeful contexts not for the strategy itself, but as a way to get to an end of comprehension.
* We should think of comprehension as a complex process involving interactions between readers and texts.
* Our classroom libraries and read alouds should include 50% fiction and 50% nonfiction.
* Content area literacy centers help students to build background knowledge.
* We can teach kids to intentionally build background knowledge themselves. It is not just about us providing scaffolding.
* Use elaborative language to more fully explain how things work to children.
* Students should have both good fit books and look at books in their book boxes. Look at books are nonfiction books in which students can increase their background knowledge by looking at pictures or reading text features.
* We can teach students to use nonfiction books that are above their good fit levels in order to research. We should teach students a strategy called stop, look, & learn. They look through a book and stop when they see something that is either interesting or that has a sentence that they are able to read. Next the student should look more closely at the picture or sentence. Lastly, they should recognize what they have learned and gained in knowledge.
*Students need to have the opportunity to write what they know and talk about what they know. People know they know what they know when they have the opportunity to share it.
* As teachers we often ask too many unimportant questions. The questions we ask must lead the learner to really think about his or her thinking.


 As if I didn't already have enough to read and think about ...
Sharon said she was tired, though I certainly couldn't tell from the way she presented. She is an absolutely phenomenal teacher. So ... what did I learn?
* Background Knowledge needs to be of much more importance in our classrooms than it is currently.
* Reading strategies should be taught as courses for action to accomplish a specific objective. We need to remember to have students practice strategies in purposeful contexts not for the strategy itself, but as a way to get to an end of comprehension.
* We should think of comprehension as a complex process involving interactions between readers and texts.
* Our classroom libraries and read alouds should include 50% fiction and 50% nonfiction.
* Content area literacy centers help students to build background knowledge.
* We can teach kids to intentionally build background knowledge themselves. It is not just about us providing scaffolding.
* Use elaborative language to more fully explain how things work to children.
* Students should have both good fit books and look at books in their book boxes. Look at books are nonfiction books in which students can increase their background knowledge by looking at pictures or reading text features.
* We can teach students to use nonfiction books that are above their good fit levels in order to research. We should teach students a strategy called stop, look, & learn. They look through a book and stop when they see something that is either interesting or that has a sentence that they are able to read. Next the student should look more closely at the picture or sentence. Lastly, they should recognize what they have learned and gained in knowledge.
*Students need to have the opportunity to write what they know and talk about what they know. People know they know what they know when they have the opportunity to share it.
* As teachers we often ask too many unimportant questions. The questions we ask must lead the learner to really think about his or her thinking.
Here are some resources Sharon Taberski recommended:
American Educator [Fall 2010] article by Susan B. Neuman. Sparks Fade, Knowledge Stays the National Early Literacy Panel's Report Lacks Staying Power.
As if I didn't already have enough to read and think about ...Saturday, July 2, 2011
Math Work Stations Chapter 5: Part 2
I have two more activities to share with you for your students to practice addition facts.
 Last year I converted an old Twister game into a math practice game. I had a lot of boys in my class and found that a bit of movement can really help keep them out of trouble. The only thing is you need to be sure to teach clearly what the expected behavior is and is not and be absolutely consistent in dealing with behavior if it is what is not expected. I just wrote in numbers on each of the circles. One partner would spin the spinner while the second partner placed his hands and feet on corresponding circles. After two spins the partner on the mat would write down the fact and solve and the two would trade places. Play would continue in this way until the kids got tired of the game. As I'm being more intentional about math workstations for next year I wanted to make a worksheet that students could fill out as they worked at this station. To download a copy from google docs click on the pictures below.

For some math talk cards to use with Twister Addition click on the picture below.

Twister Addition Math Talk Cards
On page 110 of Math Workstations, Debbie Diller suggests having students use basic fact cards to do strategy sorts. I created strategy sort cards for students to use for this activity. You may find the cards by clicking the picture below.

Addition Fact Strategy Sort
I hope what I've posted here is of help to you. Positive feedback via comments is always appreciated.
Subscribe to:
Posts (Atom)